DIY: Picture Frames
March 31, 2017
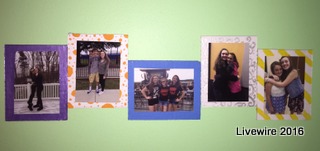
Finding a way to display favorite pictures can be hard. Or finding a nice frame to put them in can also be difficult. These DIY picture frames can make that much easier! You only need a few supplies. It is a really fun way to display pictures of your friends and family or a few of your favorite pictures that you’ve taken yourself!
This is a really easy DIY, but it does take a little more time. My family also really liked the final outcome as well. I used pictures of me and my friends, but it is up to you what type of pictures you use. Also, it is not like a normal picture frame, but gives the illusion of one.
Materials
-pictures
-cardboard
-paint
-glue
-hot glue
Steps
Step One: Cut your pictures to the desired size.
Step Two: Measure out the cardboard. These will be used as frames for the pictures and will be decorated.
Step Three: Paint the frames. They can either be a solid color or have a design on it.
Step Four: After the paint dries, glue the pictures onto the frames.
Step Five: Measure out a long piece of cardboard. The frames will be glued onto it. This will make it easier to display.
Step Six: Place the frames onto the long piece of cardboard in whatever way you wish. After deciding where they will go, glue them down.
Step Seven: You’re done! Display your new decoration however you want!